Tuesday, 2 April 2019

How to run unit test for your Xamarin Application in AppCenter?


How to run unit test for your Xamarin application in AppCenter? 

When we talk about Building and Distributing your Xamarin app, you may think about the options of using CI in between DevOps and AppCenter.

For certain reasons, I am using AppCenter to build and distribute my app to my users.  I have no issue to build and distribute my Xamarin.Forms applications. I've created one build instance for iOS application, and another one for Android application within the AppCenter.

However, a CI pipeline is considered incomplete if it doesn't contain any unit test, where it should serve as a purpose to assure your increments will not break anything you have built previously.

So, how to run unit test for your Xamarin Application in AppCenter? 

Before that, I was imagine I could find an option from a page to configure and execute the unit test project I want in AppCenter. However, this is not exists yet. Instead, you can still achieve this  by writing post-build custom script. You can write script to build, run and display the test results.

Of course, to run unit tests in your Xamarin builds, you must have a unit test project included in your solution.

Let me share with you what was blocking me while doing my discovery on how to run unit test in AppCenter: 

Create UNIT TEST Project
I am using MacBook Pro for my Xamarin application development. I was trying to create a NUnit Test Project in my VS for Mac. I started to add a new project into my existing solution with the following steps (Which is not Success):
Choose a template for your new project: .NET Core--> Test --> NUnit Test Project. Click NEXT. 
Target Framework: .NET Core 2.2. Click NEXT. 
Provide project name, etc. Click CREATE. 

OOPS! click click click...   The CREATE button is visible, but I can't click on it. It doesn't allow me to create the .net core's NUnit test project here.   (I have no idea why this isn't work for me, will try to find out the reason).

Well,  instead of using .NET CORE --> Test -->  NUnit Test Project,  I changed and created my test project using:
Choose a template for your new project: Other -->; .NET --> NUnit Library Project . (This work for me! )


How do you organise your test project? 
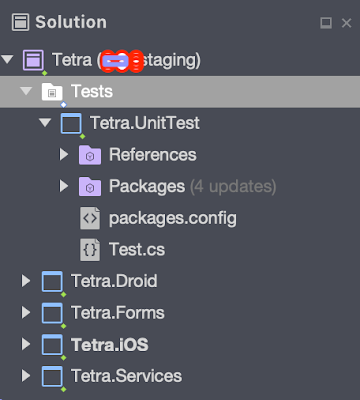
My preference will be create a Tests Folder in the same level as other projects, which I've included a unit test projects for the business logic test and potentially will put my UITest inside the same folder in the future.

How to create the custom script? 
You may copy the sample from here:
https://github.com/Microsoft/appcenter-build-scripts-examples/blob/master/xamarin/nunit-test/appcenter-post-build.sh

Or the help from: https://docs.microsoft.com/en-us/appcenter/build/troubleshooting/xamarin

What type of script we need to run the Unit Test? 
Post-Build

Steps of how to put your script into AppCenter: 
1: The location of where you should place your script file (.sh file). This is important. This will determine whether your script will be picked up by AppCenter. So, please follow the instructions as below:
  • As for iOS build, you may need to place your .sh file in the same level as where the solution file (.sln). 
  • As for Android build, you may need to place your .sh file in the same level as where the Android .csproj file. 
See Example: 


2. A tick with 'Post-build' will appear next to Build Scripts in your AppCenter. This is to ensure that you have provided your post-build script in the right place. You may need to refresh the AppCenter webpage if it is not appear:

3. Script file name - According the AppCenter, the name of the post script has to be 'appcenter-post-build.sh'.

4. Do not forget to change your build script accordingly; particularly the find command that try to look for the location of your Unit Test Project.
For instance,  my test project 'Tetra.UnitTest.proj' is within the Tetra.UnitTest folder. So, I have to change my script for iOS build

from:

To:

In Android Build (I have to use ./../ because the Tetra.UnitTest folder is located in the parent folder of the where the script is located):
To:

5. One last thing - "the killer....  it took me few days to resolve it
You may try to use some other bash script command such as ls, pwd, etc.
If you have any bash command added in your script, and it does throwing error such as Command not found, then you may need to perform the following steps:
1. Download the script.
2. Open it in Notepad++
3. Choose 'Edit' --> 'EOL Conversion' --> Make sure you choose 'Unix (LF).
4. Save your file, and upload again.

If you still failed to run your unit test, please refresh the 'Build App' page from AppCenter, click on 'Save and Build' button.

Expectation:

You should see something like this in the build output from AppCenter's build.


Happy Coding.

Jeff

Friday, 8 June 2018

Version Control in VS for Mac - How to select certain changes made from a branch into another via the Merge process...

Version Control in VS for Mac
Selectively choose the changes you want to be in the new branch when trying to merge from other branch via stage and unstage method. 


Scenario: 

Your branches:
One Master branch.
One Staging branch. 

Assumption:
You treat master branch as your daily development branch. 
Both branches have a same file called 'Detail.xaml'. 
You plan to merge some changes done master branch into your staging branch. 

Ok... let's start: 


1) 
Add a new line in detail.xaml. e.g.: 
<Label Text="This line is for master only"/>
The commit it,. and push it to master branch. 

2)
Add another line in detail.xaml (underneath the label) . e.g: 
<Label Text="This line is for master only"/>
<Label Text="This line is for staging only"/> <----- div="" line.="" nbsp="" new="">Then, commit it, and push it to master branch. 


3)
Add another line in detail.xaml .e.g:
<Label Text="This line is for master only"/>
<Label Text="This line is for staging only"/>
<Label Text="This new line is for master only"/> <----- div="" line.="" nbsp="" new="">
Then, commit it, and push it to master branch. 

With the above changes done on master branch, you should have something looks like this in your git view: 


Merge my changes into Staging

1. I switch my branch to staging first. Then click on the merge button. This will allow me choose 'Merge from Log' or 'Merge Fetched'.  (I am not clear what is the differences between these). 

I usually go for 'Merge from log',  so that I can choose the changes via log view. 
See the image below (note! I will untick the 'Commit merge immediately'):


2. Click OK,. then,.. check out the File Status on the left menu: 
Click on the File Status. 
Click on the file name. 
Right click the line in source code window. 
Choose 'Unstage selected line'. 


3. Once you have done the steps as above (After onstage a selected line),.. 
Your file will fall into 'Unstage file' section:
highlight the line you want DO NOT to be merged into staging.
Right click, then choose 'Discard selected line'. 


4. Two lines have been discarded from the source:


5. Move your file from 'Unstaged File' back to 'Staged File' by clicking on the check box next to the file name in 'Unstraged File' section. 

6. Then.. remember you need to COMMIT your file first. 
And finally PUSH your change to remote staging. 

Job done.  Double check the changes from the source code.  
And,  both the staging and master branches are in the same development line now: 

Done!
---


Thursday, 7 June 2018

Version Control in VS for Mac

Version Control in VS for mac together with Sourcetree.


It is also a painful experience when you try to use the Version Control from VS for Mac. Some people even describe it as a junk. I would say, it is sufficient to do a common stuff such as check out, commit, push, view logs, blame,.. but not Merge.  It is a basic tool which you might encounter a lot of issue when you need to manage multiple branch, merging the changes from different branches, as well as resolve the conflict and so on.  Right, this article is not able how good or bad it is. It is all about how to use it together with SourceTree. 

Well,
Pre-requisition
1) Your remote repository URL.
Let's start with the assumption that you already have a remote repository setup somewhere, either in GitHub, or VSTS, etc.  Mine is in VSTS.  Get ready your remote repository URL by just clicking on the clone button from your remote repository portal site first. 

2) Install Sourtree from the following website:  https://www.sourcetreeapp.com
Get an account from sourcetree. Just to ensure you are allow to you the tool. Do not connect to any of its given hosted account (remote Git repo, such as BitBucket, GitHub, etc).  (Unless you haven't had any remote repo yet). 


PART1: 

1) First thing first, Setup A local repository
a) I started with create empty folder called "MyTestProject" in my local machine. This will become my project folder that going to match with the project in remote repo.

b) In SourceTree window,  click on 'Local'. 
Note: 'Remote' will basically allow you to create a connection to hosted account such as BitBucket, etc) 

Instead of choosing 'Clone from URL', start with 'Add existing Local Repository'.
In this case, I will choose the folder I just created "MyTestProject".
Immediately after this, you will see a prompt with title 'Create a local repository' window. 
Keep whatever setting it is,.. then click 'Create' button. 

Done! You have the local repo setup.  (Later on, this will be the project folder you need when you are in VS.) 


2) Next, Link your local repository to the remote repository
a) Double click on the project name 'MyTestProject' from the above image. This will load another window on the screen: 


b) Setup the remote repository:  Click on the 'Repository' tab from the main window bar. Then choose 'Repository Settings'. After that choose 'Remotes'. See the image as below. And, finally click on 'Add' button. 


c) Provide a remote name and the URL. (The clone URL from the remote repo). 

d)Now, you have your remote repo setup. To your remote repo,...  
Mouse over the REMOTES menu on the left, click on the little 'show' menu next to it.  (It toggle in between show and hide).


At this point, you may have noticed there is no branches listed under the BRANCHES menu.  
And, there is nothing under the 'REMOTES' menu apart from my project name. 
So,. the next action will be... 

e) Fetch your branches from remote repo. At this point, we haven't check out all file from the remote branch yet!
Right click the project name.  (My case will be... right click on the 'MyFirstProject'.. then choose 'Fetch from my FirstProject'. ) Due to the reason I already have 2 branches exists in my remote repo (1 called master, and another one called staging), therefore I have 2 listed under my project. 


f) Checkout remote branch...  (check out all the files to you local repo).


g) Once you've done the above step. You should see your branch appear in 'BRANCHES' menu:
Right, this will be your working copy. 
Double check the check out files from your Finder.  You should have a copy of your remote file in your project folder now. 

Part 2: 

Continue the setup in VS for Mac

In Part 2, what we try to achieve is to make use of the existing version control, to work together with the version control from SourceTree.  It will ultimately produce a result where when you finished changing a file, you may either commit it via VS or SourceTree.  Or, you can even push the committed files from VS or SourceTree.  Wait... why we want to do that? 

Well, when it comes to a situation where you think you like to merge or resolve some of the code conflict,.. instead of using the Version Control from VS for Mac,  I will recommend you to use SourceTree to resolve it.  That's the whole point. 

a) As usual, open you project solution via VS. First of all you shall see the branch name next to your solution name. Example: HelloWorld (master). 

b) Click on version control --> Manage branches and remotes,  then goto 'Remote sources tab'. 

Click on Edit,.. paste the same URL that you got it from the Clone URL. 
Next, Track the branch... :


c) Setup Braches as well (If Not mistaken, this is for local repo). 

Right all done!!


Part 3: 

The magic in between SourceTree and Version Control


If you keep the source tree open,  click on a branch under the 'BRANCHES' menu, will auto reflect the selected branch in VS.  Try it... 

Right,...
VS allow you to switch the branch from one to anther. For my case,.. I should be allowed to Switch from Master to Staging. However, I am hitting this error: 

'Branch Switch Failed'.
String cannot be empty. 
Parameter name: name. 

To resolve this issue,..you have to make a changes to a file, commit it and push it.  Then, this will be resolved automatically. 


Part 4: Resolve conflict. 

Whenever you hit a conflict,  click on the conflict file, the choose external tool 'FileMerger' to resolve it.  
Remember, here is the step to resolve:
1. Choose which line you want, choose the action from the dropdown list. 
The Left window is your changes. The right window is others. 

2. Save it before you mark it as resolve. 

3. Must mark it as resolve. 


Wednesday, 9 May 2018

Xamarin - Create Launch Screen for iOS

Before iOS 8, creating a launch screen for an iOS app required the developer to provide an image asset for each of the various device from factors and resolutions in which the app could run. Therefore, you may ask you designer to come out different size of images base on official spec.

With the new Launch screen, you are recommended to use StoryBoard. Use the iOS designer to add image view and label to the storyboard, and set the constraints on those views, and to verify that looks correct for various devices, etc.

Right,...the most common problem:

Why all the images used in launch story board not appear in device? 


Right,.. after few minutes of research and testing, here are the solutions:

1. In your iOS project, double click the 'assets.xcassets' folder.  Then you will see:
- AppIcon
- LaunchImage

2. Right click on the white space, choose create new image set.  Note: you can create as many image set you like. E.g. If you going to use 2 images in the launch story board, then you probably need two image set.

3. Upload your image to 1x, 2x and 3x. (Not sure what R4 is...)

4. In your Info.plist / under the iPhone Launch Images:
- Source: None (because you are not going to use anything from 'launchImage'.
- Launch Screen:  will be your launchScreen.Storyboard.

5. This step is the most important step!!  Within your launchScreen.storyboard,.. all the image used within this board should be just the file name, with NO extension.  E.g.: if you have image named 'logo@2x.png' ,   then, please use 'logo', that's all.

6. Just incase if the image still not appear, please make sure there are set to bundle resource in resources folder.

Last things last...
if still not appear, do this as well:

"I was messing around with this for hours too. But i found the solution now. You need to add the image to your project and also to the asses.xcassets via drag and drop." 


Friday, 2 December 2016

Xamarin - Allows Local Notifications to be scheduled for a specific date and time.

Calendar Date - Allows Local Notifications to be scheduled for a specific date and time.


In iOS 10 provides 4 different Trigger types:
1. Push notification
2. Time interval
3. Calendar Date
4. Location Based

You may refer to Xamarin website about about how to use it:
https://developer.xamarin.com/guides/ios/platform_features/introduction-to-ios10/user-notifications/enhanced-user-notifications/


If you going to use 'Time interval', then here is the example:  
Embed script from gist.github.com
What If you plan to use 'Calendar Date' - Allow local notification to be scheduled for a specific date and time? Then.... you are lucky, because you on the right place now.

First of all, you wouldn't able to pass calendar datetime through this method:
UNTimeIntervalNotificationTrigger.CreateTriger(). Because this accept double type only. The expected value is milliseconds, not a date time.

Initially, I thought the method to accept calendar datetime has been left out from Xamarin.IOS. Because there are not much information about this can be found from the Xamarin website. After few hours of investigation, I finally realised that the CreateTrigger() method that support a specific date and time is actually located in different class!


"It is UNCalendarNotificationTrigger"
Please refer to the API reference about "UserNotitification - UNCalendarNotificationTrigger" : https://developer.apple.com/reference/usernotifications/uncalendarnotificationtrigger


In order to use this trigger, you need to create a DateComponents. In Xamarin, you can do something like this (this is in C#):

Embed script from gist.github.com

1 var d = new NSDateComponents();
2 d.Hour = 9;
3 d.Minutes = 10;
4 d.Month = 12;
5 d.Year = 2016;
6 d.Day = 2;
7 d.TimeZone = NSTimeZone.SystemTimeZone;

Next, create a trigger using UNCalendarNotificationTrigger:

var trigger = UNCalendarNotificationTrigger.CreateTrigger(d, false);
UNNotificationRequest request= UNNotificationRequest.FromIdentifier(requestId, content, trigger);
UNUserNotificationCenter.Current.AddNotificationRequest(request, (err)=>{
});


The above example make the calculation simple, and readable by building a trigger to fire on the exact date time.

Tested!,..It does fire on time!

Tuesday, 20 September 2016

How to Schedule Notification in Android using Xamarin - Part1 (Broadcast Receiver)

How to Schedule Notification in Android using Xamarin, Broadcast Receiver and Alarm Manager.
Note: I've split the topic into 3 parts.  

My objectives:
Eventually, I want to schedule local notification in both Android and iOS using Xamarin,Form.

Here are some of my learning steps before I can reach my final goal.
  1. Learn how to setup local notification for both iOS and Android. I've done push notification for both iOS and Android before. To be frank, Android is the one that usually need to spend more time for research, develop and bug fixing.
  2. Try to build local notification in Android 
  3. Try to understand how to pass param to pending intent.
  4. Try to use Alarm Manager as a scheduler, so that it will appear in the future.
  5. Trying to use Broadcast receiver.
  6. Change from Broadcast receiver to WakefulBroadcast receiver.
  7. To cover the flow when user reset the device (turn off and on again [Not the lock]).


Using Local Notification in Xamarin.Android
I started with the Walkthrough - Using Local Notifications in Xamarin.Android

It looks straight forward by 'reading' the web page. However, you may encounter some issues on some packages in your project:
  • 'Xamarin.Android.Support.v4'
  • 'Xamarin.Android.Support.v7.AppCompat'

Without update you may hit either 40 or 50+ error when you try to build the project due to something related to the Android.Support.v4.App, etc.  Or,.. you may hit around 9 errors, etc.

Well, after an update to those packages to: "Version 23.4.0.1", problem resolved. But, make sure you clean your projects and solution first.


Important hints!
If you are using Xamarin, then you have to:
[BroadcastReceiver] 
In the class that contain the extend to 'BroadcastReceiver', you need to have [BroadcastReceiver] attribute. Otherwise, it wouldn't hit the OnReceive()'.

Notification Icon
However, the notification itself will still not appearing if your notification is without icon. It wouldn't show up until you set an icon.

Alarm Manager & permission
In order to schedule your local notification, you may use AlarmManager.
However, don't forget to set the permission for Alarm. Required permission:  SET_ALARM

AlarmManager is a bit tricky. A lot of articles about alarm manager not fire or not trigger can be found in Internet. It is either no permission being set, or the something wrong on the Set() method.
Here is my example that work in my testing app. A small delay of 10 seconds before fire:

var pendingIntent = PendingIntent.GetBroadcast(this, 0, alarmIntent, PendingIntentFlags.CancelCurrent);
AlarmManager alarmManager = (AlarmManager)this.GetSystemService(Context.AlarmService);
alarmManager.Set(AlarmType.ElapsedRealtime, System.Clock.ElapsedRealTime() + 10 * 1000, pendingIntent);

BroadcastReceiver vs WakefulBroadcastReceiver
When you have GetBroadcast() method set in your alarmManager, basically, you have a class that extend the BroadcastReceiver to handle the message. However, due to the reason you want to handle this even though you app is not in the foreground or the user has LOCKED the device, then you might need different broadcast.
Here you go (free pages from google book,. But it does what I want) .

WakefulBroadcast
In order to use this type of broadcast (not to let your CPU to sleep), you required to set this permission: WakeLock

If you want the local notification to do something while device is restarted, how? 
Create a seperate class file, and extend it from BroadcastReceiver. Then, you need the right attribute being set on top of the class. And, a special IntentFilter, see below.
This will be triggered when device restarted:
[BroadcastReceiver(Enabled = true)]
[IntentFilter(new[] {"android.intent.action.BOOT_COMPLETED"})]
public class BootCompletedReceiver : BroadcastReceiver
{
    public override void OnReceive(Context context, Intent intent)
    { 
       //Do something here.  
       AlarmManagerHelper.SetAlarms();
    }
}


FULL EXAMPLE

Here is the example of how to create local notification in Xamarin.Android, starting by creating an creating an intent with couple of parameters; get an Alarm Manager, and set the future time of when you want to fire an the intent (a pending intent that will generate the local notification); plus the way of how to set the target page/intent of a click on the notification. 

More importantly, this via Broadcast Receiver, not WakefulBroafcast Receiver. 

Sample Code Of getting Alarm Manager.
MainActivity.cs
protected override void OnCreate(Bundle savedInstanceState)
{
     base.OnCreate(savedInstanceState);

     // Set our view from the "main" layout resource
     SetContentView(Resource.Layout.Main);

     // Get our button from the layout resource,
     // and attach an event to it
     Button button = FindViewById<Button>(Resource.Id.myButton);

     button.Click += delegate
     {
        //Create a Intent that going to fire notification. I call it 'AlarmReceiver' here. 
var alarmIntent = new Intent(this, typeof(AlarmReceiver));         DateTime now = DateTime.Now;         string message = "Jeff: " + now.Millisecond.ToString();

        // Pass param into Intent. Key and value.
        alarmIntent.PutExtra("title", "Hello");
        alarmIntent.PutExtra("message", message);

        // Create a pendingIntent, and perform broadcast. 
        // In Xamarin.Android, instead of passing context, use 'this'.
        var PI = PendingIntent.GetBroadcast(this, 0, alarmIntent, PendingIntentFlags.CancelCurrent);

        // Get the AlarmManager. Schedule time with 10 secs delay. It is in milliseconds.
        AlarmManager alarmManager = (AlarmManager)this.GetSystemService(Context.AlarmService);         alarmManager.Set(AlarmType.ElapsedRealtime, SystemClock.ElapsedRealtime() + 10 * 1000, PI);      }; }

Sample Code Of using BroadcastReceiver without wakeful and service.
AlarmReceiver.cs

//Specify the Broadcast Receiver attribute is the KEY thing in Xamarin project. 
//Note! This is extended from BroadcastReceiver. Everything is in Pending Intent. 
[BroadcastReceiver]
 public class AlarmReceiver : BroadcastReceiver
 {
        public AlarmReceiver()
        {
        }

        public override void OnReceive(Context context, Intent intent)
        {
            //Try to get the parameter set from previous intent (MainActivity) by key.
            var message = intent.GetStringExtra("message");
            var title = intent.GetStringExtra("title");

            //result Intent is the intent/page you going to show when user click on the local notification.
            //So, you can set the target page / callback page.
            var resultIntent = new Intent(context, typeof(SecondActivity));
            resultIntent.PutExtra("msg", "You clicked on the local notification!");

            //Specify how this intent is handled. 
            resultIntent.SetFlags(ActivityFlags.NewTask | ActivityFlags.ClearTask);
            //Again, need to put the page into a PendingIntent.
            var PI = PendingIntent.GetActivity(context, 0, resultIntent, PendingIntentFlags.CancelCurrent);
            //This is about how to use Notification.Builder to build a local notification.
            var builder = new Notification.Builder(context) .SetContentTitle(title) .SetContentText(message) .SetLargeIcon(BitmapFactory.DecodeResource(context.Resources, Resource.Drawable.icon))
                //Small Icon will always being used as the main icon in notification tray. 
                .SetSmallIcon(Resource.Drawable.icon) //Not quite sure how to use SetWhen
                //.SetWhen(Java.Lang.JavaSystem.CurrentTimeMillis() + 8000) 
                .SetPriority(1)
                //SetAutoCancel will auto remove the notification from system after a click on it.
                .SetAutoCancel(true) .SetDefaults(NotificationDefaults.All);             //Optional: Create Image notification.             Notification.BigPictureStyle picStyle = new Notification.BigPictureStyle();             picStyle.BigPicture(BitmapFactory.DecodeResource(context.Resources, Resource.Drawable.icon));             picStyle.SetSummaryText("This is image notification!! Hoho!");             builder.SetStyle(picStyle);             builder.SetContentIntent(PI);             var notification = builder.Build();
            //Get Notification Manager. Get ready to fire!
            var manager = NotificationManager.FromContext(context);

            //Having the same notification ID will always overwrite the old one.
            //If you prefer to keep each notification unique, then use a different unique / random id. 
            DateTime now = DateTime.Now;             var notificationID = now.Millisecond;             manager.Notify(notificationID, notification);         } }

Sample Code Of SecondActivity.
SecondActivity.cs
[Activity(Label = "SecondActivity")]
public class SecondActivity : Activity
{
        protected override void OnCreate(Bundle savedInstanceState)
        {
            base.OnCreate(savedInstanceState);

            //Get the value set in AlarmReceiver by key.
            string msg = Intent.GetStringExtra("msg");

            //If empty, then just return. 
            if (string.IsNullOrEmpty(msg))
            {
                return;
            }

            //Display the content.Get the Xml.
            SetContentView(Resource.Layout.Second);
            TextView textView = FindViewById<TextView>(Resource.Id.textView);
            textView.Text = string.Format("Param from Local notification: {0} .", msg);
        }
}

How to run unit test for your Xamarin Application in AppCenter?

How to run unit test for your Xamarin application in AppCenter?  When we talk about Building and Distributing your Xamarin app, you m...