Thursday, 28 July 2016

Wire up event and event handler in between Xamarin.Forms, and custom renderer

How to fire an event on Xamarin.Forms, and handle the event through custom renderer  in native platform? 


First of all, why do you need a custom renderer? 

hmm...   allow you to customise controls on each platform...    allow developer to override the appearance and behaviour on each platform, etc.

Right,  this post is not about how to create custom view and custom renderer. Instead, this post is all about how to trigger the event in Xamarin.Forms, declare event and attach it to Custom View and finally handle the event in Custom Renderer.

The idea is to: 


  • Create a "custom label". 
  • Create a "Custom Renderer for the custom label". 
  • Click on the custom label will fire an event. 
  • Event will be handled by the handler in native platform. 


This is my main page (landing page) in Xamarin.Forms. I have custom label named "SampleLabel".
It is registered with a tap event.  When TAP being triggered, it fires another event named 'sampleLabel.Pass_EventFromFormsToRenderer' . This is an event declared in the customView.
public class LandingPage : ContentPage
    {
        public LandingPage ()
        {
            Title = "Landing Page";
            Padding = 20;

            //Instantiate a custom label.
            SampleLabel sampleLabel = new SampleLabel ();
            //Register the tap event to this label. 
            TapGestureRecognizer tapg = new TapGestureRecognizer ();
            tapg.Tapped += (sender, e) => {
                var customArgs = new CustomArgs{
                    Date = DateTime.Now,
                    AnyText = "Hello Jeff"
                };
                //Fire this event....  

//Handle this event in native element (via custom renderer).
                sampleLabel.Pass_EventFromFormsToRenderer(this, customArgs);
            };
            sampleLabel.GestureRecognizers.Add (tapg);


            var mainLayout = new StackLayout {
                BackgroundColor = Color.Yellow,
                HorizontalOptions = LayoutOptions.FillAndExpand,
                VerticalOptions = LayoutOptions.FillAndExpand,
                Children = {sampleLabel}
            };

            Content = mainLayout;
        }
    }


Let's see what is in the custom view (SampleLabel.cs):
This custom view is a derived class from View. So that we can use ViewRenderer in the custom renderer.  If you are using a different derived class such as Entry, then you might need a EntryRenderer in your custom renderer.

Besides, 2 events have been declared in this custom view. It also means I want to have 2 events attached to this custom view.
namespace testevents
{
    //This class has a mapped renderer in native platform. 
    public class SampleLabel : View 
    {
        //Define my event handler here, with custom event arguments.
        public EventHandler<CustomArgs> Pass_EventFromFormsToRenderer;
        public EventHandler<CustomArgs> EventTwo;
    }

    public class CustomArgs : EventArgs
    {
        public DateTime Date {
            get;
            set;
        }

        public string AnyText {
            get;
            set;
        }
    }
}


Next, lets see what is in my custom renderer. 
Again, you wouldn't see any appearance being customised in the example as below, because this is all about how to wire the events and events handlers from Forms to Custom renderer.

So, in my Xamarin.iOS projects, I have created a custom renderer class named "SampleLabelIOS". As usual, you need to apply the assembly attribute to register your custom renderer to the custom view you have created in Xamarin.Forms. Subsequently, you need to extend your custom renderer class from a renderer class. In this case, I am using "ViewRenderer".

Note: Remember, if you are using ViewRendere, then you must apply the SetNativeControl().

using System;
using testevents;
using Xamarin.Forms;
using testevents.iOS;
using Xamarin.Forms.Platform.iOS;
using UIKit;

[assembly: ExportRenderer (typeof(SampleLabel),typeof(SampleLabelIOS))]
namespace testevents.iOS
{
    //Note:  I am using ViewRenderer here. Therefore apart from registering this class to SampleLabel in XamarinForms, 
    //you also need to specify what native view you want to use. In this case, I want to present UILable.
    public class SampleLabelIOS : ViewRenderer<SampleLabel, UILabel>
    {
        protected override void OnElementChanged (ElementChangedEventArgs<SampleLabel> e)
        {
            base.OnElementChanged (e);
        
            //Usually, if you use a direct renderer such as labelrenderer for a label,entryrenderer for entry or etc, 
            //you will get something in the 'Control'.  
            //In this example, Control equals to null. 
            //this is because this is a view renderer...  You need to create a view yourself. 
            //and you must apply the SetNativeControl() method.
            if (Control == null) {
                
                UILabel lbl = new UILabel {
                    Text = "Text from native renderer",
                    BackgroundColor = UIColor.Gray,
                    Frame = new CoreGraphics.CGRect (0, 0, this.Frame.Width , 100)
                };

                //Note: this is required. Without this, you will hit compilation error.
                SetNativeControl (lbl);
            }


            //Now, Handle the event in customRenderer. Why move the event handler to native view?  
            //Purely in the case when you need something, or you want to perform something available in native view. 

            //The newElement is refering to 'SampleLabel view'.
            if (e.NewElement != null) {
                var theLabelViewInForm = e.NewElement;

                //This is the place when you need to write your logic of how to handle the event. 
                theLabelViewInForm.Pass_EventFromFormsToRenderer += ((sender2, e2) => {
                    if (e2!= null){
                        var myDatetime = e2.Date;
                        var myText = e2.AnyText;

                        var alert = new UIAlertView("Alert from native iOS", "Hi from SampleListiOS renderer" + myDatetime.ToString() + " " + myText, null, "Cancel");
                        alert.Show();
                    }else{
                        var alert = new UIAlertView("Alert from native iOS", "Hi from SampleListiOS renderer", null, "Cancel");
                        alert.Show();
                    }

                });
            }


        }
    }
}


Try it out! click on the custom view (custom label), then you should see the alert. It is an alert from iOS. Not the displayAlert from Xamarin.Forms.

Happy coding!


Thursday, 21 July 2016

Token Based Authentication using ASP.NET Web API 2, Owin, and Identity

A week ago, I was looking at the tutorial of how to setup Asp.Net Web API without Authentication. It was pretty easy and straight forward. But, when you come to a point where you think you need more protection to certain functions, as well as limiting the functions to certain group of users, then you started to think about Web API with Authentication.

There are so many tutorials and examples available in internet about  how to setup Web API with token based authentication. Instead, I am not going into details of how to setup everything or the handshake mechanism, etc. I am going to share and show you what I've encountered, particularly with the desire to move the database out from the original place.

Start

So, I started with creating an ASP.NET web Application. Then, go for Web API template, with authentication type = individual accounts.

Here are some of the tricky things that I have encountered:

  • I started the whole website in debugging mode. Run it under the chrome browser, with the default localhost and the dynamic port generated by VS.  I tested it with "/help".  Hmmm.. looking good. I managed to see the API documentation. This also implies that the Web Api has been setup successfully. 
  • Next, I tried register with a new user. Again, no issue at all. A database with a random name has been created automatically after the call. You should find the database appear in App_Data folder.  Data inserted successfully.
  • This is a LocalDB (with less integration feature). But, this is also a problem for me...  
  • Sample:
    <!--add name="DefaultConnection" connectionString="Data Source=(LocalDb)\MSSQLLocalDB;AttachDbFilename=|DataDirectory|\aspnet-SecuredWebApi-20160720040853.mdf;Initial Catalog=aspnet-SecuredWebApi-20160720040853;Integrated Security=True"
          providerName="System.Data.SqlClient" /--> 
Problem I have encountered
  • I setup a website locally, host the Web Api in my IIS. I tested the newly created website with the same API request ("/help"). As a result,  no issue at all.  Next,  try it out with the registration api. Oh oh...  something wrong. It took few minutes to finish the request. And, it finished with 'request time out' error. Something went wrong with the ConnectionString.  I suspect this could be something to do with the location of the database,  etc.  Anyway, my desire is to move it out from the default location.  It is very handy to have it within the App_Data. But, I prefer to manage it via SQL management studio. 
  • Can I detach it and attach it from one place to another place? Sounds like this is an easy job, which can be done via the attach/detach built-in function. However,  this is the error when I try to attach the database through my SQL management studio (SQL server 2012): 
  • Error: "The database cannot be opened because it is version 706. This server supports version xxx and easier. A downgrade path i s not supported" ! Gosh! ...   
In fact...
  • The database will be generated only after the first call to database related function. Such as "api/account/register". So, let do something before any call to the database. 
Resolved it by:
  • Connection string - Go to Web.Config, change the connection string. Provide the right connection type you need. Re-build the project. Restart the IIS. 
  • Sample:
    <add name="DefaultConnection" connectionString="data source=(local);Initial Catalog=aspnet-SecuredWebApi-20160720040853;persist security info=False;user id=yourID;password=yourPassword;" providerName="System.Data.SqlClient"/>
  • Without warning, I got all the user related tables generated in my local database.  And, I can manage it via the SQL management studio. Bingo!


Walk through screen shots


Create a new project - Asp.Net web application


Select a template


Create a website to host the Web API


Add an entry to your local host (if you have more than 1 websites that using the same port


Test the website by calling getting the API documentation ("/help")


Yeh! at this point, at least you can confirm that the web api is working fine in IIS. 


Next, goto server explorer. Should be still nothing in database connections (oops, I should remove the arrow).


Change the connection string in Web.Config. 


Make a request to register a user through the "api/account/register" api.
Note:
Content type: application/json
Method: Post
Password length: Please refer to the min requirement set in "App_Start/IdentityConfig.cs"


Next, back to VS's server explorer. This time, you shall see something within the database connection. Bingo!


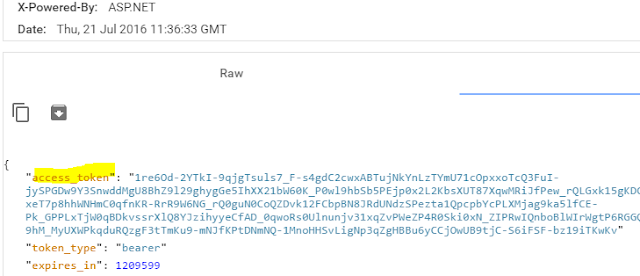
Make a request to "/Token" to get your access token. Once you have the token successfully returned from the Web API, then you are allowed to use the same access token for the subsequent access for rest of the the resources you wanted from the server. 
Login with the user you have just created.

Note:
Content type: application/x-www-form-urlencoded
Method: Post
QueryString pattern: username=xxxx&password=xxxx&grant_type=password


Continue... copy the token from the response:


Yes! From here onward, you do not need to login (or call the "/token", except for expired) anymore.
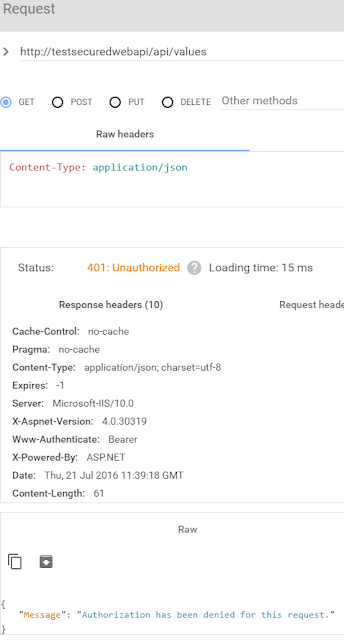
Here is the example of how to use the access_token in your request. The request to ValuesController (/api/values) require access token. This is because it is marked with  [Authorize]  attribute in the class. 


What if, without the Authorisation section in the header? 


Conclusion

I'm currently a mobile team lead  + senior developer for a company. I used to heavily involved in web application development. I understand the market as well as the important of having web application. However, the demand of providing data service to portable device is getting more important and critical. A server side service should start serving the data to various type of clients.

Web API is something that I would recommended. If you are a mobile developer, you should at least give it a try, extend the mobile development architecture from standalone model to client server, and data service based model.


Friday, 1 July 2016

Xamarin and Signal R - Chat Cross Platform

Using SignalR v2.x

2 parts:
Part 1: Create the core project, an MVC project, as a website in IIS.
Part 2: Xamarin and SignalR - Chat Cross Platform.


Part 2: Xamarin and SignalR

Common Issue:
Example:
SignalR - version of the client that isn't compatible with the server. Client version 1.4, server version undefined.

Error message: You are using a version of the client that isn't compatible  with the server.

This can be resolved easily by installing the same version from NuGet.


Sample - using SignalR Group.  - Chat.cshtml:
//https://code.msdn.microsoft.com/Getting-Started-with-c366b2f3
@{
    ViewBag.Title = "Chat";
}
<h2>Chat</h2>
<div class="container">
        <div id="typingstatus"></div>   
    <input type="text" id="message" />
    <input type="button" id="sendmessage" value="Send to everyone" />
        <input type="button" id="sendmessageToPeopleInRoom" value="Send to ppl in the same room" />
    <input type="hidden" id="displayname" />
        <input type="hidden" id="roomname" />
    <ul id="discussion"></ul>
</div>
@section scripts {
    <!--Script references. -->
    <!--The jQuery library is required and is referenced by default in _Layout.cshtml. -->
    <!--Reference the SignalR library. -->
    <script src="~/Scripts/jquery.signalR-2.2.0.min.js"></script>
    <!--Reference the autogenerated SignalR hub script. -->
    <script src="~/signalr/hubs"></script>
    <!--SignalR script to update the chat page and send messages.-->
    <script>
        $(function () {
            // Reference the auto-generated proxy for the hub.addNewMessageToPage
                var chat = $.connection.chatHub;


            // Create a function that the hub can call back to display messages.
                    //---------------Subscribe to when client is Typing and post a message to public
                chat.client.addNewMessageToPage = function (name, message) {

                    if (name == "typing") {
                        $('#typingstatus').html(message);
                    }else{
                // Add the message to the page.
                $('#discussion').append('<li><strong>' + htmlEncode(name)
                    + '</strong>: ' + htmlEncode(message) + '</li>');
                    }

                    //Clear the typing status
                    setTimeout("$('#typingstatus').empty();", 2000);
                };


            //---------------Subscribe to when client is Typing and post a message to private room
                chat.client.addChatMessage = function (name, message) {
                    $('#discussion').append('<li><strong>' + htmlEncode(name)
                    + '</strong>: ' + htmlEncode(message) + '</li>');
                };


            //--------------Subscribe to Client Join ROOM event
            chat.client.AddAnnouncement = function (roomName, message) {
                // Add the message to the page.
                $('#discussion').append('<li><strong><i>' + htmlEncode(message)
                                    + '</strong></i></li>');
            };


            //--------------General stuff
            // Get the user name and store it to prepend to messages.
            $('#displayname').val(prompt('Enter your name:', ''));
            $('#roomname').val(prompt('Enter the room name:', ''));

            // Set initial focus to message input box.
            $('#message').focus();


            $username = $('#displayname').val();
            $roomname = $('#roomname').val();

          //-------------Start the connection.
            $.connection.hub.start().done(function () {

                chat.server.joinRoom($username, $roomname);
               
                $('#sendmessage').click(function () {
                    // Call the Send to all client method on the hub.
                        chat.server.sendToAllClient($('#displayname').val(), $('#message').val());

                    // Clear text box and reset focus for next comment.
                    $('#message').val('').focus();
                });


                $('#sendmessageToPeopleInRoom').click(function () {
                    // Call the Send to all client method on the hub.
                    chat.server.sendToSpecificRoom($('#displayname').val(), $('#message').val(), $('#roomname').val());

                    // Clear text box and reset focus for next comment.
                    $('#message').val('').focus();
                });
               
            });
        });
        // This optional function html-encodes messages for display in the page.
        function htmlEncode(value) {
            var encodedValue = $('<div />').text(value).html();
            return encodedValue;
        }
    </script>
}

--------------------------------------------------------

Example of HUB: ChatHub.cs


using System;
using System.Web;
using Microsoft.AspNet.SignalR;
using System.Threading.Tasks;

namespace SignalRChat
{
    public class ChatHub : Hub
    {
        #region general method. Either individual to everyone. or broadcast.

        //In chat.chtml, the callback method is actually the client method name instead of method name. e.g: broadcastMessage
        public void SendToAllClient(string name, string message)
        {
            // Call the addNewMessageToPage method to update clients.
            Clients.All.addNewMessageToPage(name, message);

            Clients.All.broadcastMessage(name, message);
        }

        public void SendToSpecificRoom(string name, string message, string roomName)
        {
            Clients.Group(roomName).addChatMessage(name, message);
        }
        #endregion


        #region with the concept of using GROUP or ROOM
        //In javascript, need to turn the first letter of a method name to small cap.
        public void JoinRoom(string username, string roomName)
        {
            Groups.Add(Context.ConnectionId, roomName);
            RoomBroadcast(username + " has joined into " + roomName, roomName);
        }

        public void LeaveRoom(string roomName)
        {
            Groups.Remove(Context.ConnectionId, roomName);
        }

        //In chat.chtml, the callback method is actually the client method name instead of method name. e.g: broadcastMessage
        public void RoomBroadcast(string message, string roomName)
        {
            Clients.Group(roomName).AddAnnouncement(roomName, message);
        }


        #endregion


        public void Typing(string username, string message)
        {
            if (!string.IsNullOrEmpty(message)) {
                Clients.All.addNewMessageToPage("typing", username + " is typing: " + message);
            }
            else
            {
                Clients.All.addNewMessageToPage("typing", "");
            }
        }
    }
}

How to run unit test for your Xamarin Application in AppCenter?

How to run unit test for your Xamarin application in AppCenter?  When we talk about Building and Distributing your Xamarin app, you m...